Table of Contents
ToggleKitchen island lighting has evolved from purely functional overhead bulbs to design-forward fixtures that define the entire room. In 2026, homeowners are choosing lights that do double duty, illuminating prep zones while acting as visual anchors in open-concept layouts. Whether you’re upgrading an existing island or planning a full remodel, the right lighting choice balances task requirements with architectural style. The options have never been broader, from sleek pendants to industrial-inspired linear systems, but selecting fixtures that actually work for the space requires understanding scale, placement, and electrical reality.
Key Takeaways
- Modern kitchen island lighting balances task illumination, ambient brightness, and visual design—making fixture selection crucial for both function and style.
- Pendant lights remain the most versatile option for islands, with two to three fixtures spaced 24–30 inches apart at 30–36 inches above the countertop providing optimal coverage.
- Linear suspension fixtures work best for islands 8 feet or longer, offering uniform coverage without gaps and a streamlined aesthetic suited to contemporary kitchens.
- Hang kitchen island lighting 30–36 inches above the countertop, with fixture width spanning roughly two-thirds the island’s length for proportional balance and effective task lighting.
- Aim for 35–50 lumens per square foot with warm color temperature (2700K–3000K) and always install a dimmer switch to adapt brightness between cooking and entertaining.
- Verify electrical box placement is centered over the island before installation, and confirm dimmer compatibility with LED fixtures to avoid functional issues.
Why Kitchen Island Lighting Matters More Than You Think
An island often serves as the primary work surface, dining spot, and social hub in modern kitchens. Lighting it poorly creates shadows where you’re chopping, washing, or plating, functional failures that no amount of recessed ceiling cans can fully fix.
Proper island lighting addresses three needs simultaneously: task illumination (enough light for safe knife work and food prep), ambient contribution (filling in the room’s overall brightness), and visual layering (adding depth and interest to the space). Fixtures positioned directly over the island prevent the homeowner from working in their own shadow, a common issue when relying solely on perimeter lighting.
From a design perspective, island fixtures sit at eye level when standing, making them one of the most noticed elements in the kitchen. They set the tone, modern, traditional, industrial, and tie together finishes like cabinet hardware, faucets, and appliances. Ignoring this opportunity means leaving the visual center of the kitchen undefined.
Sleek Pendant Lights: The Modern Classic
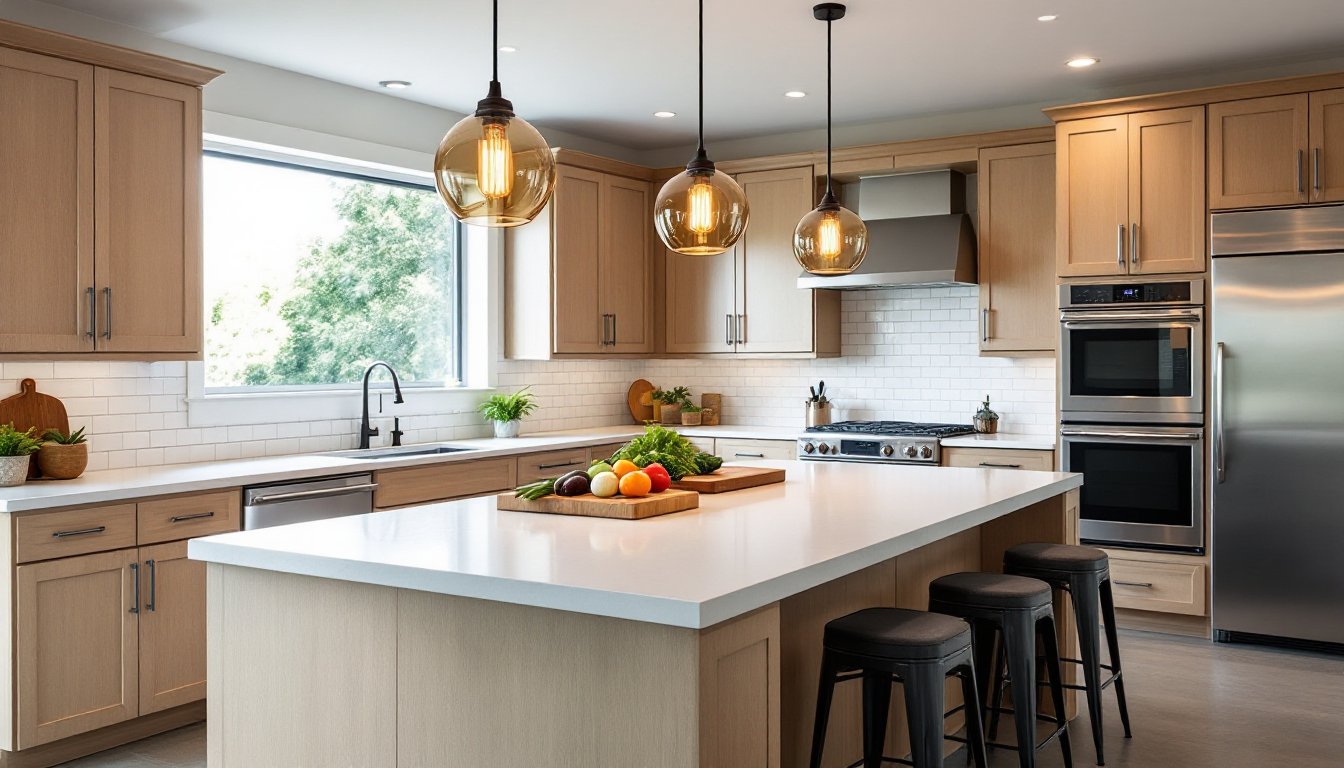
Pendant lights remain the workhorse of island lighting because they’re adaptable, affordable, and available in nearly every style. A modern take typically features clean lines, geometric shapes, and materials like brushed nickel, matte black, clear or frosted glass, and occasional wood or concrete accents.
For a standard 6- to 8-foot island, most designers spec two to three pendants, spaced 24 to 30 inches apart and centered over the countertop. Single large pendants work for smaller islands (under 5 feet), while oversized globes or drum shades suit minimalist aesthetics. The key is proportion: a 10-inch diameter pendant looks lost over a massive island, while a 16- to 18-inch shade feels more intentional.
Glass globe pendants are trending heavily in 2026, especially smoked or amber glass that softens LED brightness without losing output. Pendant lighting offers flexibility across different lighting styles common in contemporary homes. Metal cage or wire-frame styles lean industrial: smooth ceramic or matte-finished metal reads Scandinavian or mid-century.
Installation is straightforward if there’s already a junction box in the ceiling. Most pendants use a standard canopy mount and hang from an adjustable cord, chain, or rod. If the electrical box isn’t centered over the island, hire an electrician to relocate it, off-center pendants look sloppy and create uneven light. Dimmer compatibility matters: confirm that both the fixture and bulbs support dimming if you plan to install a dimmer switch.
Linear Suspension Fixtures for Contemporary Kitchens
Linear suspension lights are single, elongated fixtures that span much or all of the island’s length. They’ve surged in popularity for long islands (8 feet or more) and work particularly well in contemporary or transitional kitchens with clean lines and minimal ornamentation.
These fixtures come in several forms: LED strip housings with integrated diffusers, multi-bulb bar designs (often with exposed Edison or globe bulbs), and tubular designs with internal LEDs. The advantage is uniform coverage, no dark gaps between pendants, and a streamlined look that doesn’t compete with cabinetry or backsplash tile.
Size is critical. A 48- to 60-inch linear fixture suits a 7- to 9-foot island: anything shorter looks pinched, anything much longer risks overhang beyond the island edges. Leave at least 6 inches of clearance on each end. Many modern linear lights feature adjustable hanging cables at multiple points, allowing the fixture to hang level even if the ceiling is slightly out of plane.
Installation typically requires a junction box rated for the fixture’s weight (check the manufacturer’s spec sheet). Linear fixtures can be heavy, some weigh 15 to 25 pounds, so verify the box is properly anchored to a ceiling joist or blocking. For inspiration and practical examples, browse curated galleries like those on Houzz’s kitchen island lighting page.
Linear fixtures often use integrated LEDs, which means you can’t swap bulbs. Confirm the color temperature (2700K to 3000K for warm white) before purchasing, it’s permanent. Dimmable drivers should be standard, but verify compatibility with your dimmer type (Lutron, Leviton, etc.).
Statement Chandeliers That Blend Form and Function
Chandeliers over kitchen islands might sound traditional, but modern iterations, geometric cages, branching Sputnik designs, or sculptural multi-arm fixtures, offer drama without fussiness. They work best in kitchens with higher ceilings (9 feet or more) and larger islands that can handle visual weight.
A modern chandelier should provide downlight, not just ambiance. Look for designs with downward-facing bulbs or integrated LED panels that direct light onto the work surface, not just outward into the room. Candelabra-style chandeliers with upward-facing bulbs are decorative but functionally weak unless paired with supplemental recessed or under-cabinet lighting.
Scale matters intensely here. A chandelier should be roughly one-half to two-thirds the width of the island to feel balanced. For an island seating area, a larger fixture can anchor the dining zone: for a prep-focused island, keep it more compact to avoid head clearance issues. When considering high-end options, luxury lighting fixtures can serve as functional art pieces in modern kitchens.
Installation considerations: Chandeliers are heavier than pendants. Confirm the junction box is ceiling fan–rated (up to 50 pounds) or install a fan brace box if needed. Hanging height follows the same rule as pendants (see section below). If the chandelier has multiple arms or asymmetrical geometry, ensure it’s centered and level, any tilt is immediately obvious.
Minimalist Track and Rail Lighting Systems
Track lighting has shed its 1990s reputation and re-emerged as a flexible, modern solution for kitchens with unusual island shapes or multi-use zones. Current systems use low-profile tracks (often matte black or brushed nickel) with movable heads that can be repositioned without rewiring.
Modern track systems fall into two categories: standard line-voltage track (120V) and monorail systems. Monorail is more sculptural, curved or angular rails with pendant-style heads, while standard track is linear and utilitarian. Both allow homeowners to adjust light direction and intensity as needs change. For a comprehensive overview of modern track options, see our guide to contemporary track lighting systems.
Advantages: Track adapts to irregular island layouts (L-shapes, curves, or islands with seating on one side and prep on the other). It’s also DIY-friendly if the track connects to an existing junction box. Most systems snap together and don’t require hardwiring each head individually.
Disadvantages: Track reads industrial or commercial, which may clash with traditional or transitional kitchens. It also requires careful aiming, poorly adjusted heads create glare or leave dark spots.
Installation is simpler than multi-pendant setups. Mount the track to the ceiling (into joists or with toggle anchors for drywall), connect it to the junction box, and snap in the heads. Most systems are dimmable, but confirm bulb compatibility (LED, halogen, or incandescent). Use BR30 or PAR30 bulbs for focused task lighting: A19 bulbs for softer ambient fill.
Choosing the Right Size, Height, and Placement
Hanging island lights at the wrong height is one of the most common DIY mistakes, too low and you’ll smack your head: too high and the light becomes decorative rather than functional.
Standard hanging height is 30 to 36 inches above the island countertop (measured from the bottom of the fixture to the surface). For islands with seating, stick to the higher end (36 inches) to maintain sightlines across the table. For prep-only islands, 30 to 32 inches maximizes task illumination. If the ceiling is higher than 9 feet, add 3 inches of drop for every additional foot of ceiling height.
Fixture width should be proportional. For pendants, total fixture coverage (including spacing between them) should span roughly two-thirds the island’s length. For a single linear fixture or chandelier, aim for half to two-thirds the island width. A 4-foot island pairs well with a 24- to 30-inch fixture: an 8-foot island can handle a 48- to 60-inch linear light. If designing for kitchens with two islands, coordinate lighting fixtures to maintain visual consistency across both zones.
Electrical placement: The junction box should center over the island lengthwise and widthwise. If you’re installing an island during a remodel, plan the electrical rough-in before drywall. Moving a box after the fact requires cutting into the ceiling, patching, and repainting, not the end of the world, but avoidable with planning.
Brightness and color temperature: For task lighting, aim for 35 to 50 lumens per square foot over the island. A typical island (3 feet by 6 feet = 18 square feet) needs roughly 630 to 900 lumens total. Most modern pendants use 60W-equivalent LEDs (800 lumens each), so two to three fixtures hit the target. Stick with 2700K to 3000K color temperature for warm, inviting light that doesn’t skew food colors. Cooler temps (3500K+) feel clinical in residential kitchens unless you’re deliberately going for a commercial aesthetic, as seen in some galleries on The Kitchn.
Dimmer switches are non-negotiable. Install a compatible dimmer (check the fixture specs, many LEDs require specific dimmer models) so you can dial down brightness for dining or entertaining. A bright island during meal prep shouldn’t mean glare during dinner.
Conclusion
Kitchen island lighting in 2026 is about intentional choices, fixtures that work as hard as they look. Whether you opt for the versatility of pendants, the clean span of a linear fixture, the presence of a modern chandelier, or the flexibility of track systems, prioritize proportion, proper height, and adequate brightness. Measure twice, confirm electrical placement, and don’t skip the dimmer. The island is the heart of the kitchen: light it like you mean it.


