Table of Contents
TogglePendant lights above a kitchen island aren’t just about illumination, they’re where function meets focal point. Get it right, and the island transforms into a well-lit workspace that anchors the entire kitchen. Get it wrong, and you’re stuck with shadows at meal prep or fixtures that smack foreheads. This guide cuts through the guesswork, covering size, spacing, height, style, and installation so homeowners can make informed decisions before drilling a single hole or calling an electrician.
Key Takeaways
- Kitchen pendant lighting over islands should be sized at one-third to two-thirds the island width, with 30 to 36 inches between fixture centers for balanced illumination and visual appeal.
- Hang pendant lights 30 to 36 inches above the countertop, adjusting lower for task-focused prep zones and higher for seating areas to prevent obstruction and maximize focused light delivery.
- Island length determines pendant count: one for islands under 5 feet, two for 5–7 feet, and three or more for islands over 7 feet to eliminate dark gaps.
- Most pendant installation over kitchen islands uses existing electrical runs beneath dropped ceilings, making retrofitting simpler than wall sconces, though you must verify circuit capacity and follow NEC standards.
- Choose LED-compatible dimmers, verify fixture weight ratings with proper ceiling boxes (fan-rated for heavy pendants over 10 pounds), and always confirm power is off with a voltage tester before installation.
- Popular styles like glass globes, drum shades, and industrial cages suit different kitchen aesthetics, but prioritize accessible bulb replacement and finishes that resist moisture and splatter in the kitchen environment.
Why Pendant Lights Are Perfect for Kitchen Islands
Pendants deliver task lighting exactly where it’s needed, directly over prep zones, seating areas, and serving spaces. Unlike recessed cans that cast broad, diffuse light, pendants drop illumination in a focused cone. That precision means fewer shadows when dicing vegetables or reading recipes.
They also define the island as a distinct zone within an open floor plan. A row of matching pendants visually separates cooking space from living areas without walls or bulky furniture. This spatial definition works especially well in kitchens with two islands, where lighting helps establish hierarchy and flow.
From a wiring standpoint, most islands sit beneath a dropped ceiling run or soffit where electrical boxes already exist or can be added relatively easily. That makes retrofitting pendants simpler than adding wall sconces or relocating ceiling fixtures. Just confirm the existing circuit can handle the additional load, most 15-amp kitchen circuits can support several LED pendants without issue, but check local NEC requirements if adding multiple high-wattage fixtures.
How to Choose the Right Size and Number of Pendants
Pendant Size Guidelines
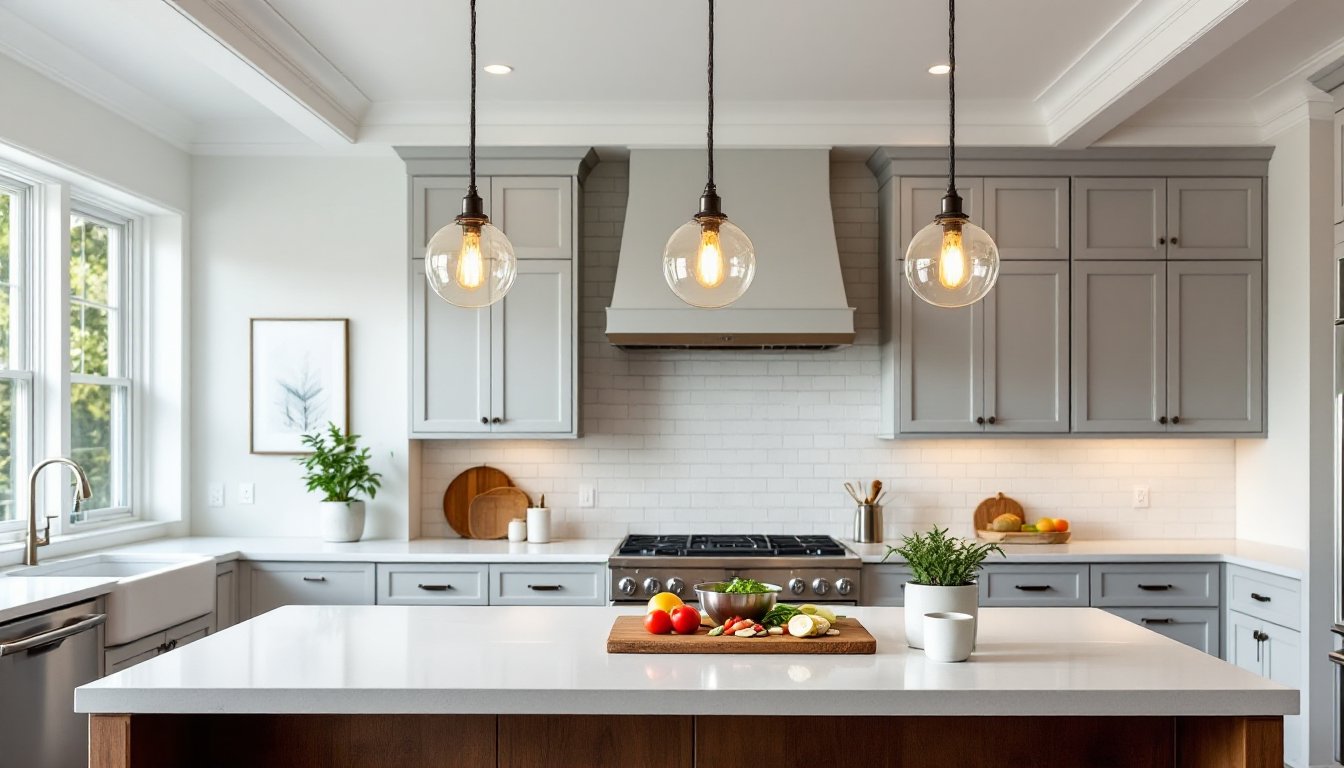
Diameter matters. A common rule: pendant width should be one-third to two-thirds the width of the island. For a 36-inch-wide island, that’s 12 to 24 inches in diameter per fixture. Go smaller, and the light looks toyish: go larger, and it overwhelms the space or blocks sightlines.
Height of the pendant also affects perceived size. A tall drum or elongated globe pendant needs a narrower diameter to avoid crowding the vertical space. Conversely, a shallow dome can push toward the wider end of the range. When in doubt, mock up cardboard circles at the planned drop height and view from multiple angles, kitchen table, stove, entryway, before committing.
Material and finish play a role too. Clear glass pendants feel lighter and less intrusive, even at larger diameters. Opaque metal or ceramic shades carry more visual weight, so consider downsizing by a few inches if the design skews heavy.
How Many Pendants Should You Hang?
Island length dictates count. For islands under 5 feet long, a single centered pendant or two smaller fixtures work. 5 to 7 feet typically calls for two pendants. Over 7 feet, three or more prevents dark gaps.
Spacing rule of thumb: 30 to 36 inches between pendant centers, measured from the middle of one fixture to the next. This interval provides even coverage without clustering. For a 6-foot (72-inch) island with two pendants, position them 18 inches from each end, leaving 36 inches between.
Odd numbers often look more dynamic than even, especially in contemporary or minimalist lighting styles. Three pendants over a long island create rhythm: two can feel static unless the design itself has strong visual interest.
Ideal Hanging Height and Placement
Standard hanging height is 30 to 36 inches above the island countertop. This range keeps fixtures out of the way while directing light downward. For islands used primarily for food prep, hang closer to 30 inches to maximize task illumination. If the island doubles as a breakfast bar with seating, push toward 36 inches so pendants don’t obstruct conversation or sightlines.
Ceiling height affects the equation. In rooms with 8-foot ceilings, stick to the lower end of the range and choose compact pendants. 9- to 10-foot ceilings allow more flexibility, fixtures can hang higher and use longer downrods or chain without feeling cramped. For ceilings over 10 feet, consider adjustable-height pendants or multi-drop canopies to bring light back into the functional zone.
Measure from the finished countertop surface, not the floor. Granite, quartz, and butcher block all have different thicknesses, and undermount sinks add depth. Use a laser level or plumb line to mark the bottom edge of where the pendant will hang, then step back and verify clearance before cutting drywall or installing junction boxes.
Keep pendants at least 12 inches from the island edge on all sides. This prevents shoulder bumps when reaching across and keeps cords or chains from interfering with cabinet doors or drawers. If the island has an overhang for seating, measure from the countertop edge, not the knee wall below.
Popular Pendant Light Styles for Kitchen Islands
Glass globes and spheres suit transitional and mid-century kitchens. Clear or seeded glass diffuses light softly, while colored glass adds a pop without pattern clash. Expect to clean fingerprints and grease splatter regularly, these sit in the kitchen’s splash zone.
Drum pendants work in modern and farmhouse settings. A linen or metal drum shade provides broad, even light and hides the bulb completely. Choose a shade with a white or metallic interior to maximize reflection. Dark interiors absorb light, requiring higher-wattage bulbs to achieve the same output.
Cage and geometric pendants bring industrial or contemporary edge. Exposed bulbs inside wire or metal frames deliver strong downlight and uplight, brightening both counters and ceilings. Pair these with vintage Edison-style LED bulbs for warm tones and lower energy draw, standard incandescent bulbs in open fixtures burn through 60 watts and generate excess heat.
Bell and dome shades fit traditional, craftsman, and coastal kitchens. Metal or enamel domes direct light downward sharply, ideal for task-heavy zones. Porcelain enamel is easy to wipe down and resists moisture better than painted finishes.
Multi-light clusters group several small pendants at varied heights from a single canopy. These work well over kitchens without upper cabinets, where the lack of cabinetry allows statement fixtures to shine. Installation is more complex, each drop requires precise measurement and a sturdy canopy rated for the combined weight. The variety of lighting styles available on design sites like Houzz can spark ideas, but always verify dimensions and proportions against the actual island before ordering.
Installation Tips for DIY Success
Turn off power at the breaker, not just the wall switch. Use a non-contact voltage tester to confirm wires are dead before touching anything. Kitchen circuits often share neutrals or tie into GFCI-protected outlets, don’t assume the labeled breaker is the only one involved.
If existing ceiling boxes are offset from the desired pendant locations, install new boxes before drywall repair. Pancake boxes rated for fixture weight work in shallow ceiling cavities where joists aren’t accessible. For heavier pendants (over 10 pounds), use a fan-rated box anchored to a joist or install a retrofit brace bar between joists. Check the pendant manufacturer’s specs, glass and metal fixtures can easily exceed standard box ratings.
Wire gauge matters. Most pendant kits include 18-gauge wire, fine for low-wattage LEDs. If retrofitting older fixtures or running new circuits, use 14-gauge wire on 15-amp circuits or 12-gauge on 20-amp circuits per NEC standards. Undersized wire overheats and fails inspection.
Adjust cord or chain length before final wiring. It’s easier to trim excess than to splice extensions later. For adjustable-height pendants, thread the cord through the canopy completely, hold the fixture at the target height, and mark where to lock the cord grip. Leave an extra inch of slack inside the canopy, cords stretch slightly over time, and tight connections stress wire nuts.
Install dimmers compatible with the bulb type. LED bulbs require LED-compatible dimmers: standard incandescent dimmers cause flicker or buzzing. If the island pendants share a circuit with other light fixtures, ensure all bulbs on that circuit can dim, or install a dedicated circuit for the pendants.
Test the fixture before reinstalling canopy covers or trim. Flip the breaker, confirm all bulbs light, and check for flicker, hum, or loose connections. If the fixture buzzes, the bulb wattage may exceed the socket rating, or the dimmer isn’t compatible.
Safety note: Pendant installation over an island doesn’t typically require a permit if you’re replacing an existing fixture on the same circuit. Adding new circuits, relocating boxes, or working in kitchens undergoing major remodels often does. Check local building codes, requirements vary widely. If the project involves opening walls or running new cable through insulation, hire a licensed electrician. Mistakes behind drywall are expensive to fix and dangerous to ignore.
For complex setups, such as multiple pendants on separate switches or integrated with inside cabinet lighting, a second pair of hands helps. One person steadies the fixture while the other connects wires and secures the canopy. Pendants are awkward to hold overhead while twisting wire nuts.
Finally, consider the view from The Kitchn perspective: the island is often the first thing visitors see when entering the kitchen. Pendants that suit the room’s function and aesthetic make a strong impression without requiring constant maintenance or adjustment. Choose fixtures with accessible bulb sockets, reaching into a narrow glass globe with needle-nose pliers to change a bulb gets old fast.


